This is a SCAM! You will need to remove this from your PC!!
I did the following and it worked perfectly..
copy the code from the site, not this post..just to be sure.
http://www.myantispyware.com/2010/03/17/how-to-remove-xp-defender-pro-removal-guide/How to remove XP Defender Pro (Removal guide)XP Defender Pro is new clone of XP Internet Security 2010, which is a rogue antispyware program. The fake security program only looks like a real antispyware application, but unlike it, can not remove viruses and trojans, as well as protect your computer from possible infections.
XP Defender Pro is installed onto your computer through the use of trojans completely invisible, it does not output any warnings and requests to install. During installation, the rogue configures itself to run every time when you run any program (files with .exe extension) on your computer. Once started, it begins to scan your computer and in the process finds a lot of infected files, trojans, viruses, and so on. These results are nothing but deception, XP Defender Pro uses the results of scanning as a method designed to scare you into thinking that your computer in danger.
In order to create the fully simulation that you computer is infected, XP Defender Pro will display various fake security warnings and hijack Internet Explorer and Firefox, so it will display fake warnings when you opening a web site. However, all of these alerts and warnings are a fake and like false scan results should be ignored!
If you get infected with XP Defender Pro, please do not be fooled into buying it. Instead of doing so, follow the XP Defender Pro removal guide below in order to remove this malware, and any other clones of XP Internet Security 2010.
Use the following instructions to remove XP Defender Pro (Uninstall instructions)
Step 1. Repair �running of .exe files�.
Method 1
Click Start, Run. Type command and press Enter. Type notepad and press Enter.
Notepad opens. Copy all the text below into Notepad.
Windows Registry Editor Version 5.00
<-HKEY_CURRENT_USER\Software\Classes\.exe>
<-HKEY_CURRENT_USER\Software\Classes\secfile>
<-HKEY_CLASSES_ROOT\secfile>
<-HKEY_CLASSES_ROOT\.exe\shell\open\command>
@="\"%1\" %*"
@="exefile"
"Content Type"="application/x-msdownload"
Save this as fix.reg to your Desktop (remember to select Save as file type: All files in Notepad.)
Double Click fix.reg and click YES for confirm.
Reboot your computer.
Method 2
Click Start, Run. Type command and press Enter. Type notepad and press Enter.
Notepad opens. Copy all the text below into Notepad.
Signature="$Chicago$"
Provider=Myantispyware.com
DelReg=regsec
AddReg=regsec1
HKCU, Software\Classes\.exe
HKCU, Software\Classes\secfile
HKCR, secfile
HKCR, .exe\shell\open\command
HKCR, exefile\shell\open\command,,,"""%1"" %*"
HKCR, .exe,,,"exefile"
HKCR, .exe,"Content Type",,"application/x-msdownload"
Save this as fix.inf to your Desktop (remember to select Save as file type: All files in Notepad.)
Right click to fix.inf and select Install. Reboot your computer.
Step 2. Remove XP Defender Pro associated malware.
Download MalwareBytes Anti-malware (MBAM).
http://www.myantispyware.com/2008/08/28/malwarebytes-anti-malware-free-spyware-malware-trojan-remover/
Once downloaded, close all programs and windows on your computer.
Double-click on the icon on your desktop named mbam-setup.exe. This will start the installation of MalwareBytes Anti-malware onto your computer. When the installation begins, keep following the prompts in order to continue with the installation process. Do not make any changes to default settings and when the program has finished installing, make sure a checkmark is placed next to �Update Malwarebytes� Anti-Malware� and Launch �Malwarebytes� Anti-Malware�. Then click Finish.
MalwareBytes Anti-malware will now automatically start and you will see a message stating that you should update the program before performing a scan. If an update is found, it will download and install the latest version.
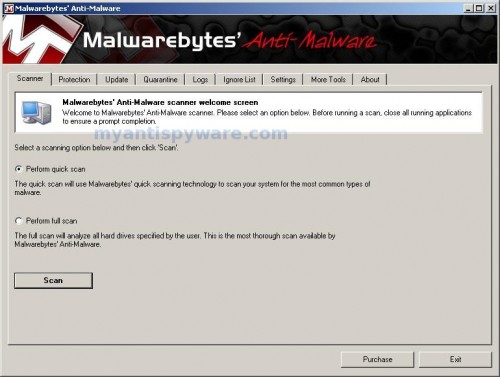
As MalwareBytes Anti-malware will automatically update itself after the install, you can press the OK button to close that box and you will now be at the main menu. You will see window similar to the one below.

malwarebytes-antimalware1
Malwarebytes Anti-Malware Window
Make sure the �Perform quick scan� option is selected and then click on the Scan button to start scanning your computer for XP Defender Pro infection. This procedure can take some time, so please be patient.
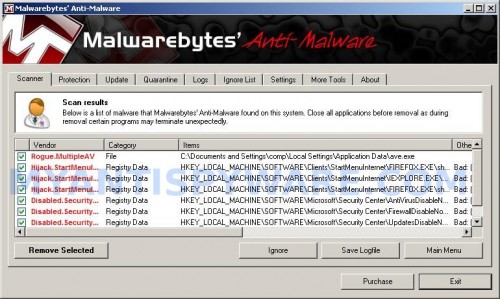
When the scan is finished a message box will appear that it has completed scanning successfully. Click OK. Now click �Show Results�. You will see a list of infected items similar as shown below.
Note: list of infected items may be different than what is shown in the image below.

XP Smart Security 2010 remover
Malwarebytes Anti-malware, list of infected items
Make sure all entries have a checkmark at their far left and click �Remove Selected� button to remove XP Defender Pro. MalwareBytes Anti-malware will now remove all of associated XP Defender Pro files and registry keys and add them to the programs� quarantine. When MalwareBytes Anti-malware has finished removing the infection, a log will open in Notepad and you may be prompted to Restart.
Note 1: if you can not download, install, run or update Malwarebytes Anti-malware, then follow the steps: Malwarebytes won`t install, run or update � How to fix it.
Note 2: if you need help with the instructions, then post your questions in our Spyware Removal forum.
XP Defender Pro creates the following files and folders
%AppData%\ave.exe
XP Defender Pro creates the following registry keys and values
HKEY_CURRENT_USER\Software\Classes\.exe
HKEY_CURRENT_USER\Software\Classes\.exe\DefaultIcon
HKEY_CURRENT_USER\Software\Classes\.exe\shell
HKEY_CURRENT_USER\Software\Classes\.exe\shell\open
HKEY_CURRENT_USER\Software\Classes\.exe\shell\open\command
HKEY_CURRENT_USER\Software\Classes\.exe\shell\runas
HKEY_CURRENT_USER\Software\Classes\.exe\shell\runas\command
HKEY_CURRENT_USER\Software\Classes\.exe\shell\start
HKEY_CURRENT_USER\Software\Classes\.exe\shell\start\command
HKEY_CURRENT_USER\Software\Classes\secfile
HKEY_CURRENT_USER\Software\Classes\secfile\DefaultIcon
HKEY_CURRENT_USER\Software\Classes\secfile\shell
HKEY_CURRENT_USER\Software\Classes\secfile\shell\open
HKEY_CURRENT_USER\Software\Classes\secfile\shell\open\command
HKEY_CURRENT_USER\Software\Classes\secfile\shell\runas
HKEY_CURRENT_USER\Software\Classes\secfile\shell\runas\command
HKEY_CURRENT_USER\Software\Classes\secfile\shell\start
HKEY_CURRENT_USER\Software\Classes\secfile\shell\start\command
HKEY_CURRENT_USER\Software\Classes\.exe\shell\open\command | @ = ��%AppData%\ave.exe� /START �%1″ %*�
HKEY_CURRENT_USER\Software\Classes\.exe\shell\open\command | IsolatedCommand = ��%1″ %*�
HKEY_CURRENT_USER\Software\Classes\.exe | @ = �secfile�
HKEY_CURRENT_USER\Software\Classes\.exe | Content Type = �application/x-msdownload�
HKEY_CURRENT_USER\Software\Classes\secfile\shell\open\command | @ = ��%AppData%\ave.exe� /START �%1″ %*�
HKEY_CURRENT_USER\Software\Classes\secfile\shell\open\command | IsolatedCommand = ��%1″ %*�